ArtBot
Senior Capstone Project
As a senior capstone, we (a team of three mechanical engineering students and two computer engineering students) could create anything we wanted. After a lot of deliberation (and a lot of bad ideas) we came up with the idea of creating a robot that could turn any JPEG into a painting.
We started by finding some inspiration online. We knew we wanted to make it using some sort of GCODE, CNC set up. We knew that we could make a CNC machine pretty cheaply (relative to our $700 budget) and that we could spend most of our time figuring out the coding, and figuring out how we could get paint onto the canvas.
So we found a website online that gave some good information on the basics of setting up a motor-driven CNC machine, and we purchased really large versions of the materials they recommended off of McMaster-Carr. We used the CAD files that McMaster-Carr provides to plan out the fabrication. It ended up like this:
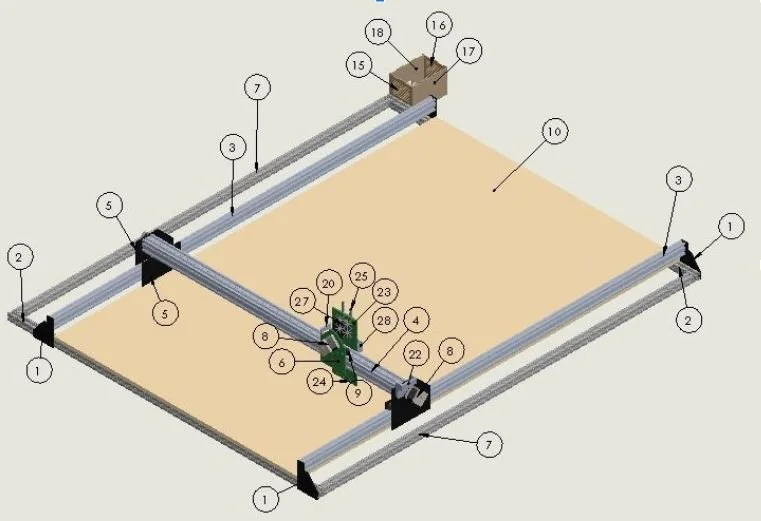
For reference, the wood board (the large peach/yellow colored object) is 6 foot by 3 foot. And we planned on laying paper down for our paintings.
So next, we split up into a mechanical team and a software team. The mechanical team’s main mission would be to design and fabricate the z-axis movement, which would be the part that would allow us to actually put pen to paper, and then eventually, paint to paper. We had a few ideas, but after a while, I came up with a rack and pinion system.
We ended up moving forward with this idea because it allowed us to use the precision of a stepper motor as well as use any rack and pinion pairing we wanted, so we could chose a pinon with a lot of teeth to give us incredible amounts of precision. This would allow us to control how much paint we would get on the brush when we dipped it into the paint well.
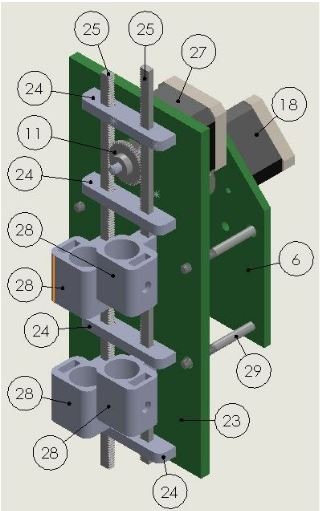
The pen/paintbrush would be held by the objects labeled as #28, and would be moved up and down by the gear (#11). This would also allow us to use multiple colors and multiple brush widths. Everything in the photo above was custom designed and 3D printed/laser cut (beside the gear, two racks, and motors in the back). I was the design lead for our team so a lot of the designing was my duty.
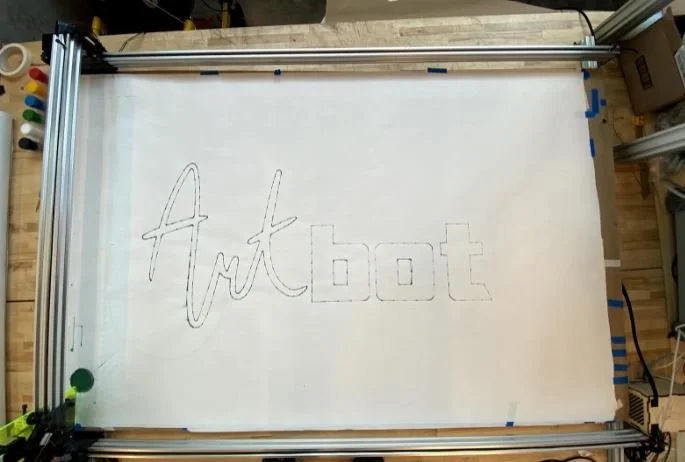
Below is a video of our first successful switch between two colored markers.
Once we got the z-axis to move consistently how we wanted it to, all that was left was to adjust the GCODE so that we could start working with paint. As it stood, we had a software that could turn a JPEG into vectors, and we could turn those vectors into GCODE. However, if we wanted to do anything in paint, we needed to edit that code and say “every X inches, go back to paint well and dip in to get more paint.” Eventually, after some fine tuning to figure out how long “X” would be, we were able to consistently paint pictures.
Below are some of the art that ArtBot produced.


Here is a video to show how the painting feature works.